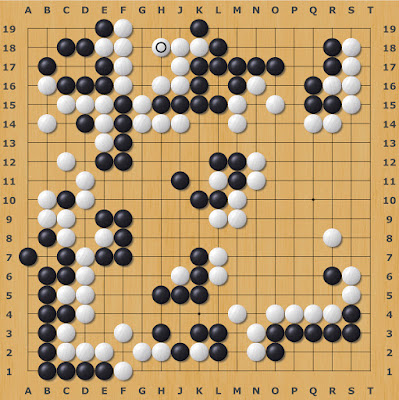
For years now it has been the consensus that I need to play more aggressively and see my opponent’s weaknesses. In-Seong and Shawn Ray both agree on this point. Yilun Yang once referred to my inability to see an obvious attacking move (that everyone else would be able to see) as my “special weakness”.
I am beginning to make progress on this issue, In a recent game, however, I failed to clinch the deal on what should have been a beautiful kill.
I had a Free League game with a YD friend this week. Earlier in the day I had a lesson with Clossius. I had been advised by him, that I should not be showing losses by large numbers in my games list. If I am obviously losing I should make a last ditch effort to turn the game around. If that fails I should resign.
During my Free League game I kept this in mind. I attempted to be more aggressive, and I tried to kill white’s group at the top of the board. I reduced from the outside along the top edge. Then I considered a placement at g17 on move 153. I did not see the full continuation, but I believe now that once white made his next move the continuation would have become obvious. I should have trusted my instincts. Instead I played elsewhere.
Neither player realized that the group needed to be killed, or saved on the next move, depending on our own perspective.
I knew I was behind. I counted about 50 points for myself. I counted 50 points for my opponent with many more points to be counted plus komi. So I resigned.
But I forgot to make the last ditch effort. Here is the final board position.
It turns out that Score Estimator, which is notoriously wrong much of the time, thought that white’s group along the top of the board was dead.
My opponent and I do not put much stock in Score Estimator, but we decided to briefly look at it. I remembered my desire to play g17, and it became painfully clear that it worked regardless of what white might to do to counter it. A throw in at g16 will eventually take place.
Up to this point I had reached my conclusions without the help of AI.
There was a point during our review after the game where I believe an alternative move for white was considered at h19 rather than h18, but that does not appear to work either.
Later I took a look at the game in AI-Sensei. Setting the app to look at only mistakes in excess of 20 points, a hilarious graph emerged.
I decided to navigate to the point just before the kill became inevitable, if I were to have actually played at g17. I can’t remember if my opponent and I had considered the move at A during our review or not, but we did later discuss it on Discord.
- The placement g17
- The addition of another stone at g16
- The throw in at g16


3 comments:
I'd like to note that diagram 4 is not fully correct.
After black G17 and white G16, black should play at J19 instead of G18. If black plays at G18, white can play at J19 and lives in seki (at least).
I was going to make the same comment. Reducing the size of the space avoids the seki.
It's fixed now.
Post a Comment